
Hardhat Setup (Typescript)
이 튜토리얼에서는 Typescript를 사용하여 Hardhat 프로젝트를 생성하고 루니버스 노드와 연동하는 방법을 소개합니다.
Hardhat은 전세계에서 가장 많은 사람들이 사용하는 이더리움 개발 프레임워크 입니다. 본 문서에서는 루니버스에서 제공하는 Ethereum Node를 Hardhat과 연동하는 방법을 소개합니다. 루니버스에서 제공하는 Ethereum Node와 Hardhat을 연하여 여러분만의 블록체인 프로젝트를 구성해 보세요!

1. Requirements
이 튜토리얼을 원활하게 진행하기 위한 환경 설정이 필요합니다. 아래의 가이드를 참고하여 필요한 부분을 준비해주세요.
1-1. 루니버스 회원가입
루니버스의 개발 환경을 사용하려면 루니버스 콘솔에서 회원 가입을 해야 합니다. 회원가입 방법은 아래의 가이드를 참고하세요.
1-2. 노드 생성
블록체인 네트워크와 상호작용하려면 노드를 생성해야 합니다. 이번 튜토리얼은 Ethereum Sepolia 환경에서 진행됩니다. 따라서 노드 생성 시, 네트워크를 반드시 Ethereum Sepolia로 선택하세요.
만약 루니버스 콘솔에서 노드 생성이 처음이라면 아래 가이드 문서를 참고하세요.
How to Create Multichain Node?
1-3. NodeJS & NPM 설치
NodeJS는 자바스크립트 런타임 환경입니다. 아래의 링크에서 자신의 운영체제에 맞는 버전을 다운로드하고 설치하세요.
NodeJS 설치 시 주의사항
꼭 LTS 최신 버전을 설치 해주세요! 일반 최신 버전은 튜토리얼 진행시 에러가 발생할 수 있습니다.
NodeJS 설치가 완료 되었다면, 버전이 v18 이상인지 확인합니다. NodeJS를 설치하면 노드 패키지를 관리하는 툴인 NPM도 함께 설치가 됩니다. NodeJS와 NPM이 설치되었는지 확인할 수 있습니다.
node -v
npm -v
1-4. 지갑 생성하기
지갑은 사용자의 자산을 보관하는 도구로, public key와 private key로 구성되어 있습니다. 아래의 가이드에 따라 지갑을 생성하고 private key를 확인해보세요.
- Metamask 설치: Metamask는 브라우저 기반의 지갑 플러그인입니다. Metamask 공식 홈페이지에서 브라우저에 맞는 버전을 설치하세요.
- 지갑 생성: Metamask 플러그인을 열고 "Get Started"를 클릭하여 새 지갑을 생성하세요. 지갑 생성 과정에서 제공되는 니모닉(단어들의 나열)을 안전하게 저장하세요.
-
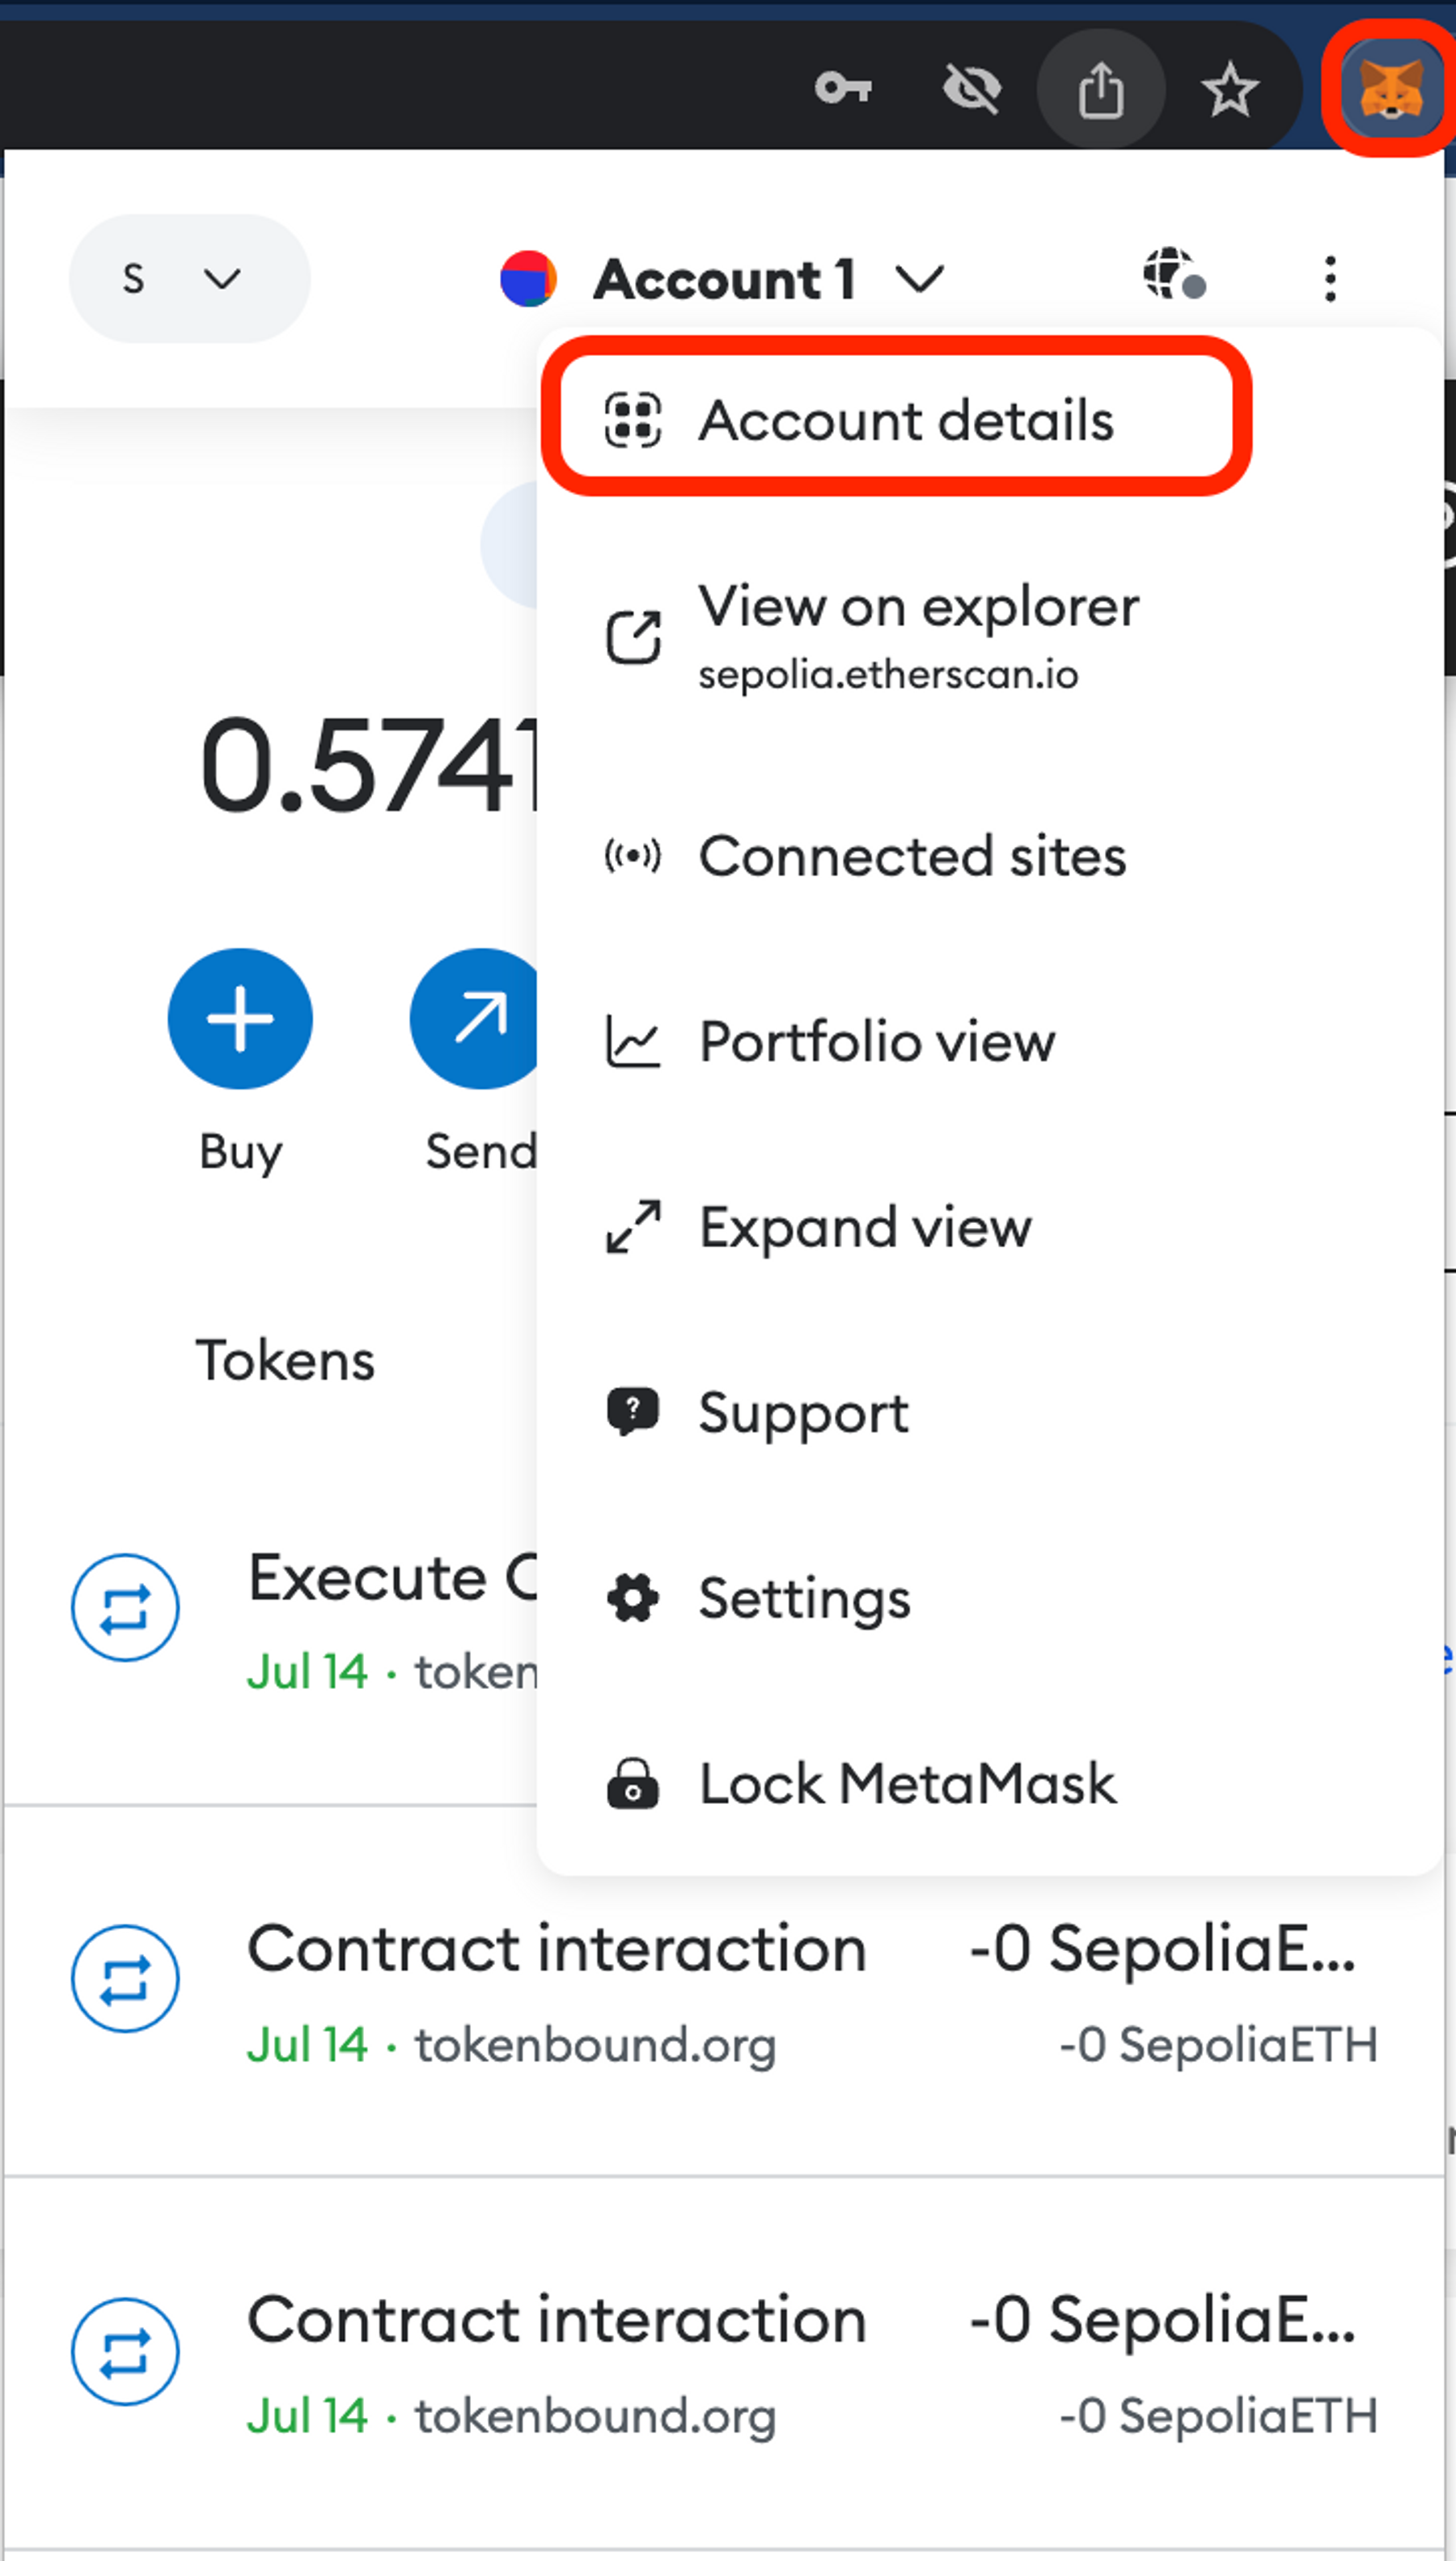
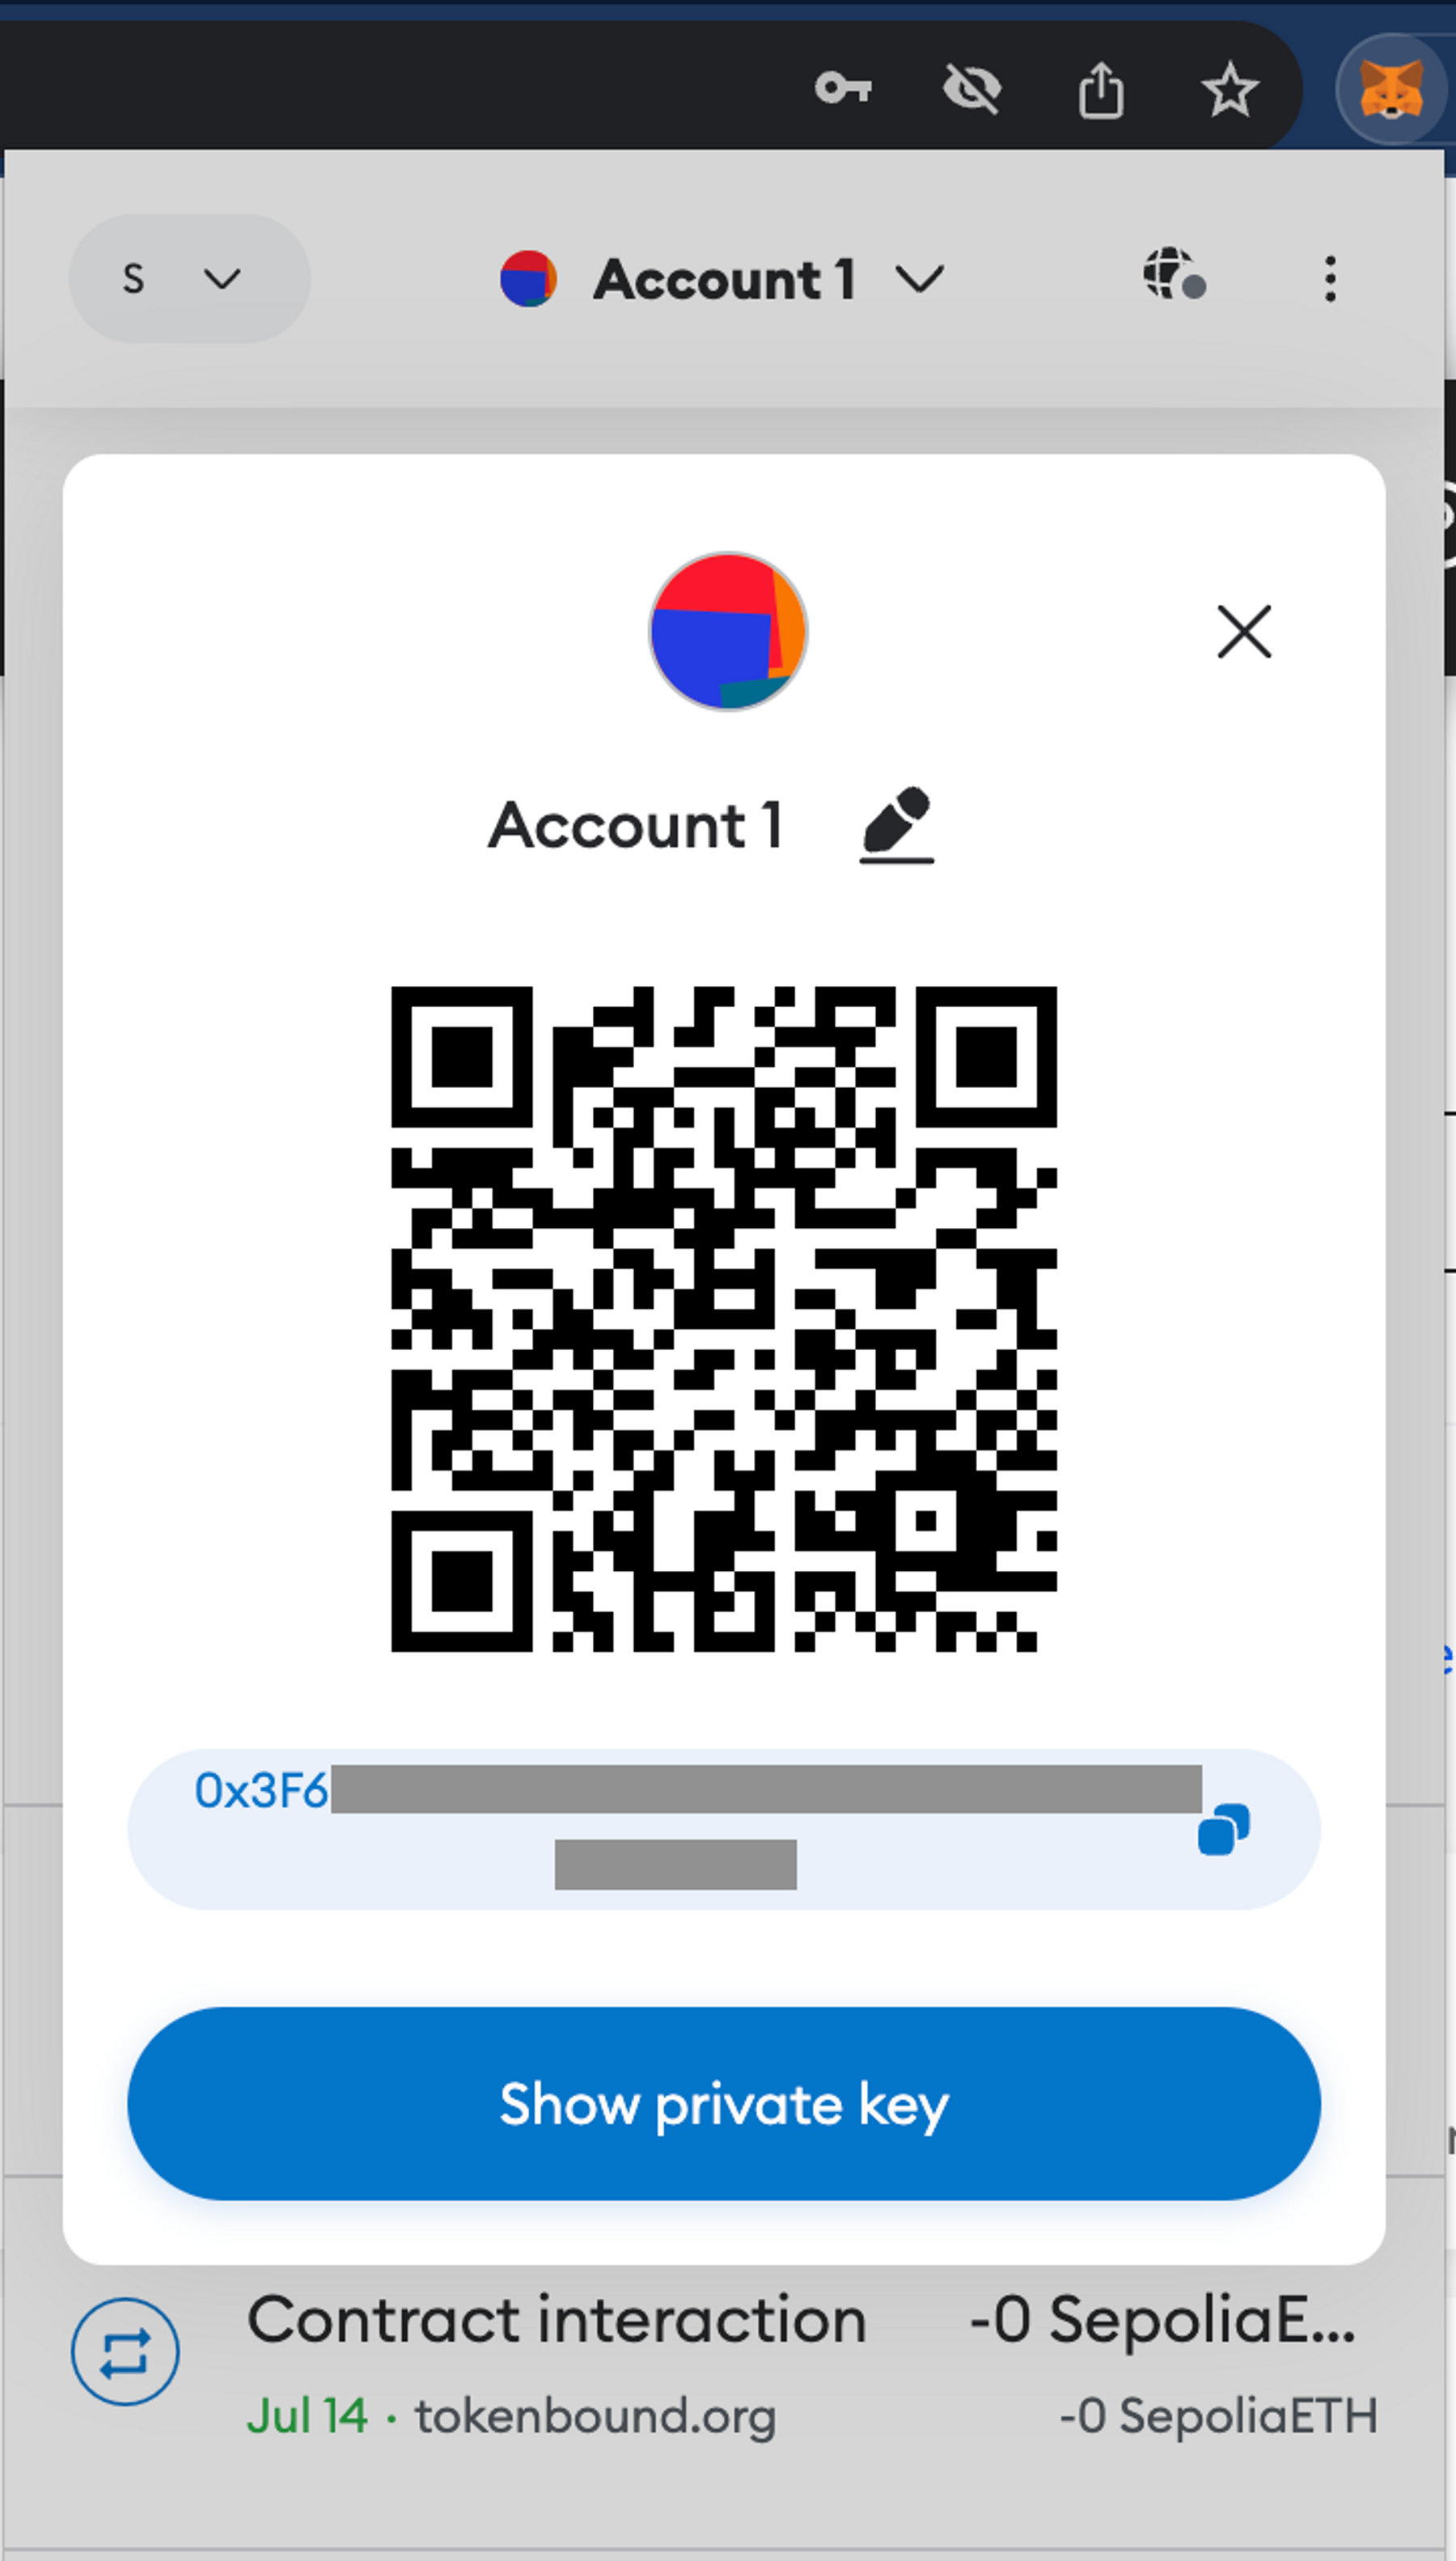
- Private Key 얻기: Metamask에서 생성한 지갑 주소를 클릭하여 상세 정보를 확인하세요. "Account details"를 클릭하면 "Show private Key" 옵션이 보입니다.
Private Key 관리시 주의사항
Private Key는 매우 중요한 정보입니다. 절대로 타인에게 노출되지 않도록 주의하시고, 안전한 곳에 보관하세요. Private Key가 노출되면 지갑의 자산을 잃을 수 있습니다.
이제 여러분은 프로젝트를 생성할 준비가 되었습니다! 다음 단계에서는 Hardhat 프로젝트를 설정하고 루니버스 노드와 연결하는 방법을 배워보겠습니다.
2. Create a New Project
2-1. 프로젝트 폴더 생성 및 이동
앞으로 작업할 새로운 폴더 생성한 뒤, 생성한 폴더로 이동합니다.
mkdir luniverse-hardhat
cd luniverse-hardhat
2-2. npm 프로젝트 초기화
npm 프로젝트 생성을 위해 아래 명령어를 실행해주세요. 명령어를 실행하면 package.json 파일이 생성됩니다.
npm init -y
2-3. 필요한 라이브러리 설치
프로젝트에 필요한 라이브러리를 설치해주세요.
npm install --save-dev hardhat @nomicfoundation/hardhat-toolbox typescript ts-node dotenv
2-4. Hardhat 프로젝트 생성
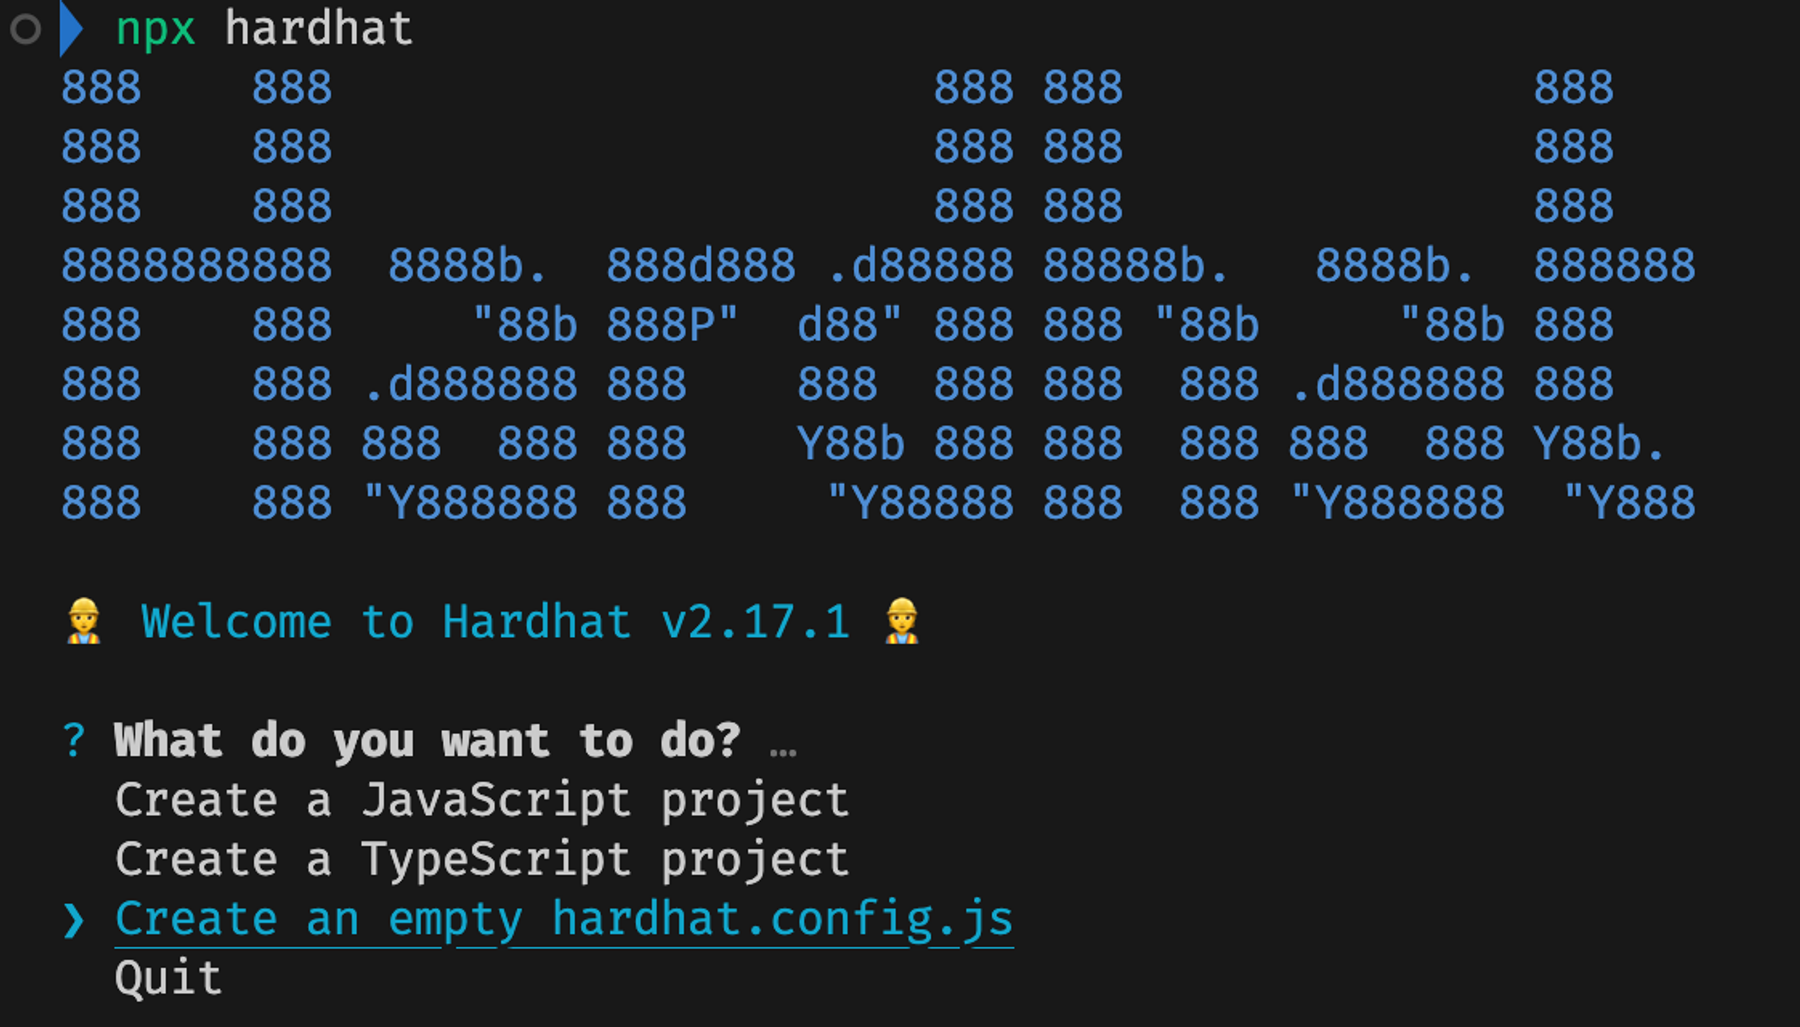
hardhat 설치가 완료되었다면 hardhat을 실행해주세요.
npx hardhat
hardhat을 실행하면 아래 그림과 같이 원하는 옵션을 선택할 수 있습니다. 여기서는 세번째 옵션을 선택하여 비어있는 프로젝트를 생성해주세요.
2-5. 개발에 필요한 폴더 구조 생성
스마트 컨트랙트 개발에 필요한 폴더 생성합니다.
mkdir contracts
mkdir scripts
mkdir tasks
mkdir test
contracts: 이 폴더에는 스마트 컨트랙트의 소스 코드가 저장됩니다.scripts: Hardhat 환경과 플러그인을 활용하여 다양한 작업을 위한 스크립트들이 위치합니다.tasks: 커스텀 태스크를 정의하기 위해 Hardhat의task메서드를 사용하는 파일들이 저장됩니다.test: 스마트 컨트랙트의 테스트를 위한 파일들이 이 폴더에 저장됩니다.
2-6. Hardhat 설정 파일 수정
hardhat.config.js 파일을 타입스크립트 파일로 변경합니다.
mv hardhat.config.js hardhat.config.ts
hardhat.config.ts 파일의 코드를 아래와 같이 수정합니다.
@nomicfoundation/hardhat-toolbox: hardhat에서 제공하는 플러그인으로 “ethers.js”, “Mocha”, “Chai” 등의 다양한 툴을 포함하고 있습니다. 이를 이용하여 스마트 컨트랙트를 deploy, interact, verify 등의 작업을 수행할 수 있습니다.
// hardhat.config.ts
import { HardhatUserConfig } from "hardhat/config";
import "@nomicfoundation/hardhat-toolbox";
const config: HardhatUserConfig = {
solidity: "0.8.19",
};
export default config;
2-7. TypeScript 환경 설정
타입스크립트 환경설정 파일(tsconfig.json)을 생성합니다.
touch tsconfig.json
생성한 파일 안에 아래와 같이 작성합니다.
// tsconfig.json
{
"compilerOptions": {
"target": "es2020",
"module": "commonjs",
"esModuleInterop": true,
"forceConsistentCasingInFileNames": true,
"strict": true,
"skipLibCheck": true,
"resolveJsonModule": true
}
}
3. Connecting to Luniverse Node
환경변수를 저장할 파일(.env)을 생성합니다.
touch .env
환경변수에 노드의 RPC endpoint와 내가 사용할 지갑의 private key를 작성합니다.
// .env
RPC_ENDPOINT="Your_RPC_Endpoint"
DEPLOYER_PRIVATE_KEY="Your_Private_Key"
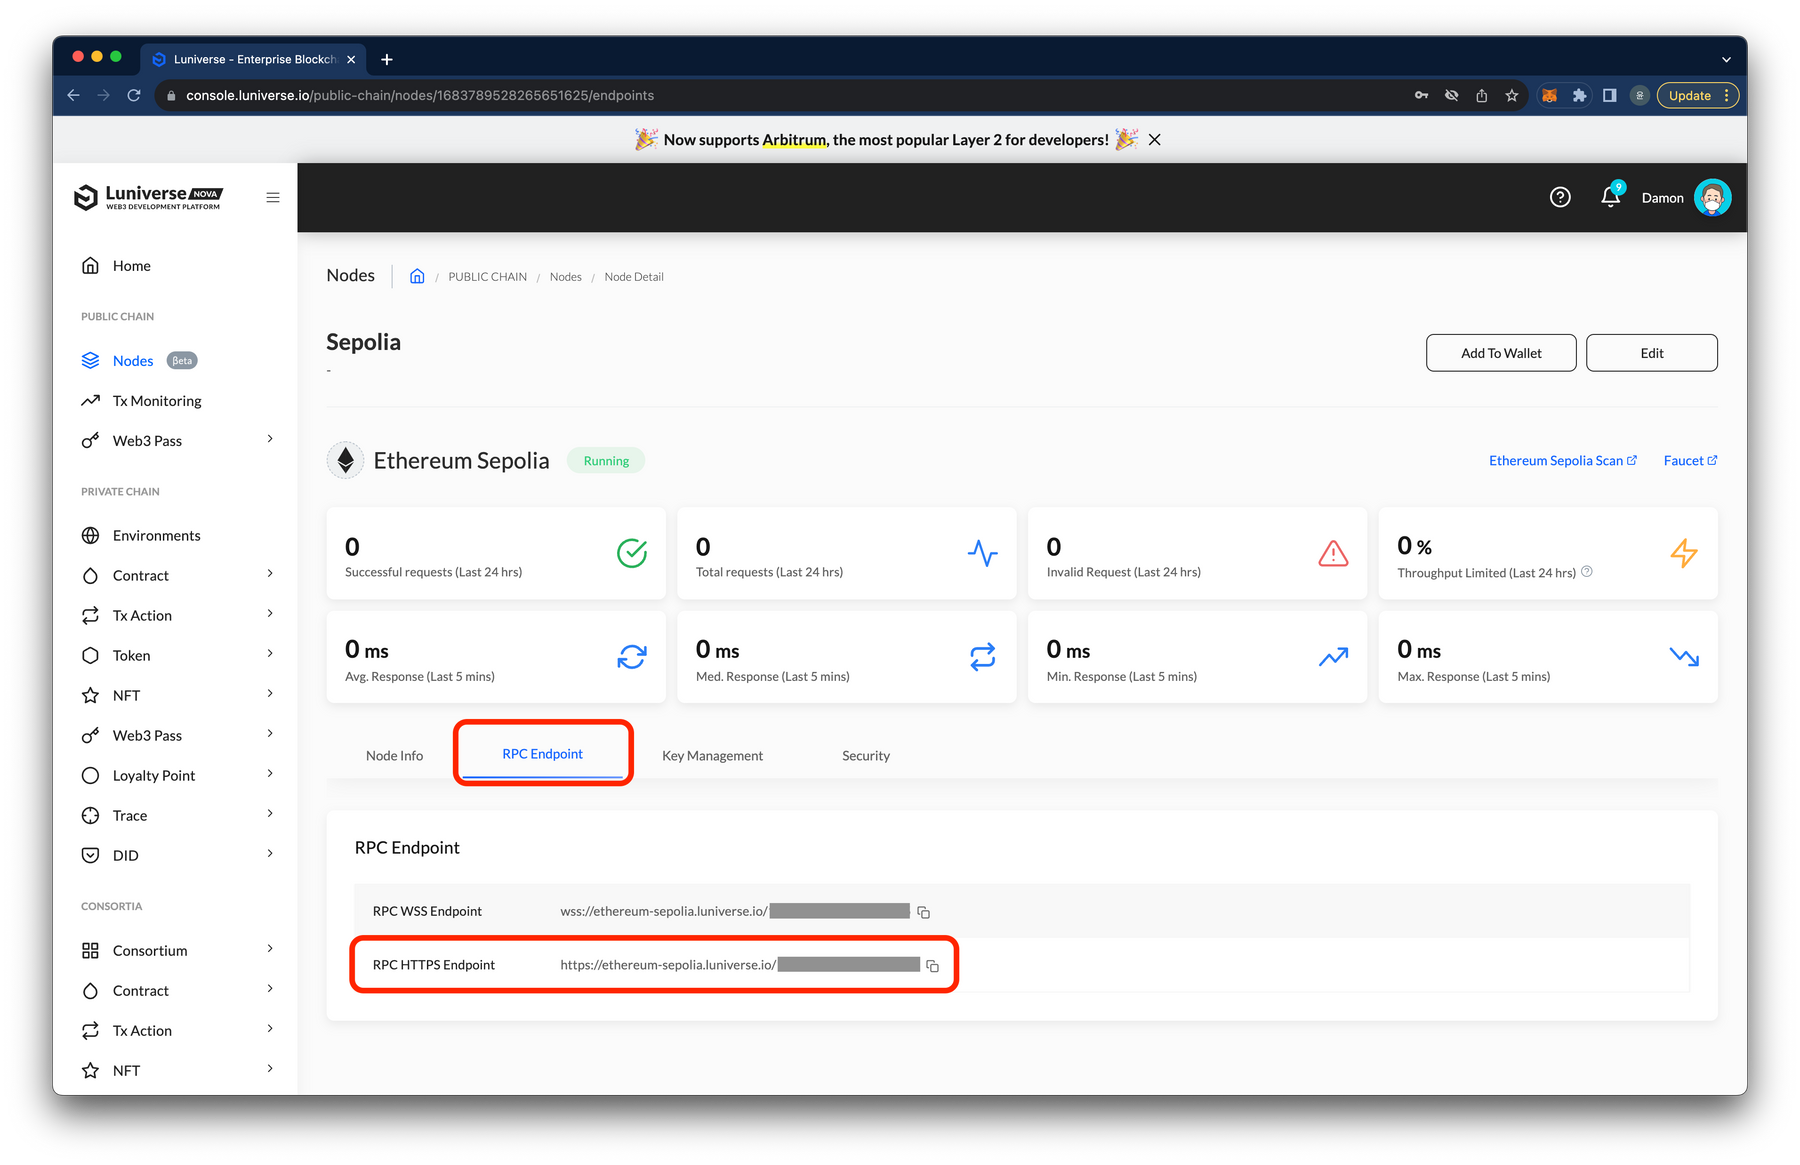
RPC_ENDPOINT는 어디서 확인하나요?
먼저 [1-2. 노드 생성] 단계에서 생성한 노드의 상세화면에 들어갑니다. 탭 메뉴 중에서 RPC Endpoint를 선택합니다. 이 중 RPC HTTPS Endpoint를 복사하여 사용할 수 있습니다.
Hardhat 설정 파일(hardhat.config.ts)의 코드를 아래와 같이 변경합니다.
// hardhat.config.ts
import { HardhatUserConfig } from "hardhat/config";
import "@nomicfoundation/hardhat-toolbox";
import dotenv from "dotenv";
dotenv.config();
const { RPC_ENDPOINT, DEPLOYER_PRIVATE_KEY } = process.env;
const config: HardhatUserConfig = {
solidity: "0.8.19",
networks: {
sepolia: {
url: RPC_ENDPOINT,
accounts: [DEPLOYER_PRIVATE_KEY || ""],
},
},
defaultNetwork: "sepolia",
};
export default config;
4. Writing and Compiling Contracts
contracts 폴더에 HelloLuniverse.sol 파일을 생성하고 아래의 코드를 작성합니다.
// contracts/HelloLuniverse.sol
// SPDX-License-Identifier: UNKNOWN
pragma solidity >=0.8.0;
contract HelloLuniverse {
string public message;
constructor(string memory initMessage) {
message = initMessage;
}
function updateMessage(string memory newMessage) public {
message = newMessage;
}
}
이 컨트랙트는 메시지를 저장하고 업데이트하는 기능을 제공합니다
message: 문자열 타입의 상태 변수constructor: 컨트랙트가 배포될 때 한 번만 호출되는 생성자 함수로, 초기 메시지 값을 받아message상태 변수에 저장합니다.updateMessage(): 이 함수는 새로운 메시지를 받아message상태 변수의 값을 업데이트합니다.
아래 명령어를 터미널에 입력하여 위에서 작성한 컨트랙트를 컴파일 합니다.
npx hardhat compile
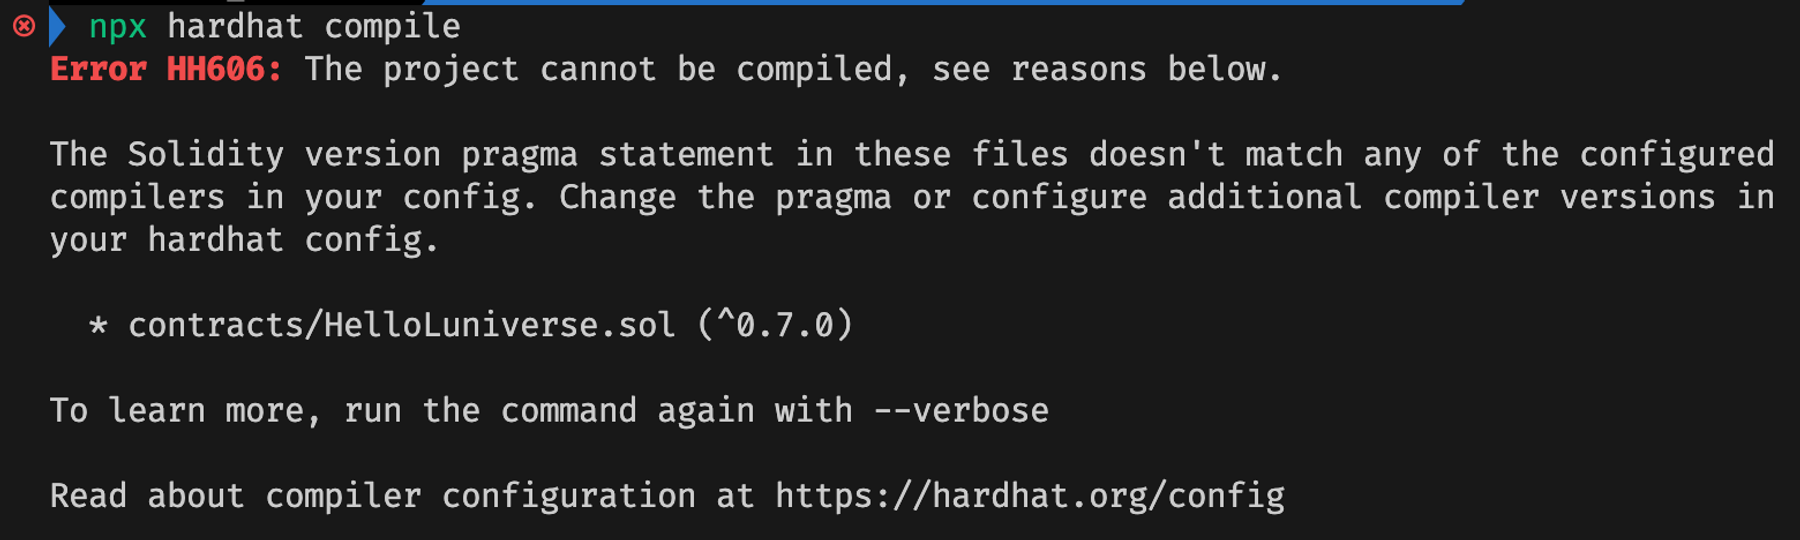
Solidity 버전이 다르면 어떻게 되나요?
성공적인 컴파일을 위해서는
hardhat.config.ts에서 설정한 Solidity의 버전과 컨트랙트 코드의 solidity 버전(e.g.,pragma solidity >=0.8.0;)이 일치해야 합니다. 만약 다른 버전을 설정한 경우, 컴파일에 실패하며 아래와 같은 에러 메세지가 반환됩니다.
5. Testing Contracts
이번 단계에서는 HelloLuniverse 컨트랙트가 예상대로 동작하는지 확인하기 위해 테스트를 진행합니다.
먼저, test 디렉토리 내에 helloLuniverse.ts 파일을 생성합니다. 그리고 아래의 코드를 해당 파일에 작성합니다.
// test/helloLuniverse.ts
import { ethers } from "hardhat";
import { expect } from "chai";
import { HelloLuniverse } from "../typechain-types";
const HELLO_LUNIVERSE_MESSAGE = "Hello Luniverse!";
const UPDATE_MESSAGE = "Update message";
describe("Hello Luniverse", function () {
let helloLuniverse: HelloLuniverse;
before(async () => {
const helloLuniverseFactory = await ethers.getContractFactory(
"HelloLuniverse"
);
helloLuniverse = await helloLuniverseFactory.deploy(
HELLO_LUNIVERSE_MESSAGE
);
await helloLuniverse.waitForDeployment();
});
it("should have HELLO_LUNIVERSE_MESSAGE", async () => {
const message = await helloLuniverse.message();
expect(message).to.equal(HELLO_LUNIVERSE_MESSAGE);
});
it("should update with UPDATE_MESSAGE", async () => {
const tx = await helloLuniverse.updateMessage(UPDATE_MESSAGE);
await tx.wait();
const message = await helloLuniverse.message();
expect(message).to.equal(UPDATE_MESSAGE);
});
});
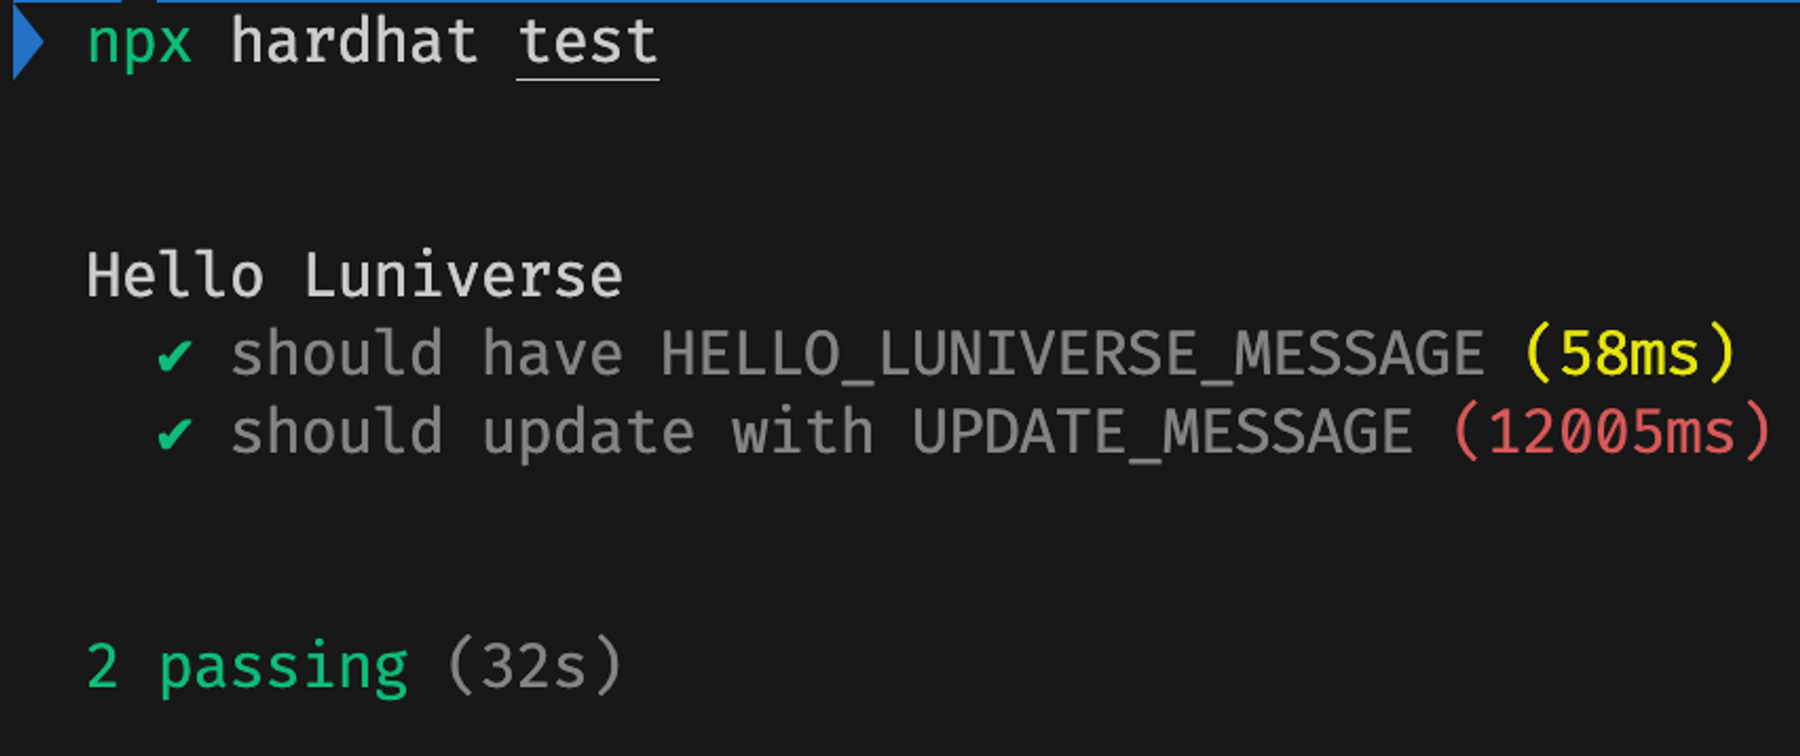
터미널 창에 아래 명령어를 실행하여 테스트를 수행합니다.
npx hardhat test
6. Writing Scripts and Tasks
6-1. Deploying Contracts with Scripts
scripts 폴더에 deploy.ts 파일을 생성한 후, 아래의 코드를 작성해주세요.
// scripts/deploy.ts
import { ethers } from "hardhat";
async function main() {
const initialMessage = "Hello Luniverse";
const [deployer] = await ethers.getSigners();
console.log("Deploying contract with the account:", deployer.address);
const helloLuniverse = await ethers.deployContract("HelloLuniverse", [
initialMessage,
]);
await helloLuniverse.waitForDeployment();
console.log(
"Contract deployed to address:",
await helloLuniverse.getAddress()
);
console.log(
`Deployment TX: https://sepolia.etherscan.io/tx/${
helloLuniverse.deploymentTransaction()?.hash
}`
);
}
main().catch((error) => {
console.error(error);
process.exitCode = 1;
});
터미널 창에 아래 명령어를 입력하여 스크립트 실행합니다. 스크립트가 실행되면 우리가 작성한 HelloLuniverse 컨트랙트를 배포합니다.
npx hardhat run scripts/deploy.ts
6-2. Interacting with Contracts using Tasks
task를 생성하여 컨트랙트와 상호작용할 수 있습니다.
tasks 폴더에 helloLuniverse.ts 파일을 생성하고 아래와 같이 작성합니다.
// tasks/helloLuniverse.ts
import { task } from "hardhat/config";
interface UpdateTaskArgs {
contract: string;
message: string | "New Message";
}
interface ReadTaskArgs {
contract: string;
}
task("update", "Update the HelloLuniverse contract")
.addParam("contract", "The address of the HelloLuniverse contract")
.addParam("message", "The new message of the HelloLuniverse contract")
.setAction(async (taskArgs: UpdateTaskArgs, hre) => {
const helloLuniverse = await hre.ethers.getContractAt(
"HelloLuniverse",
taskArgs.contract
);
const tx = await helloLuniverse.updateMessage(taskArgs.message);
const receipt = await tx.wait();
console.log(`The message has been updated to ${taskArgs.message}`);
console.log(`Update TX: https://sepolia.etherscan.io/tx/${receipt?.hash}`);
});
task("read", "Read the message state of the HelloLuniverse Contract")
.addParam("contract", "The address of the HelloLuniverse contract")
.setAction(async (taskArgs: ReadTaskArgs, hre) => {
const helloLuniverse = await hre.ethers.getContractAt(
"HelloLuniverse",
taskArgs.contract
);
const messageState = await helloLuniverse.message();
console.log(`Current message: ${messageState}`);
});
update: 이 태스크는HelloLuniverse컨트랙트의message상태 변수를 업데이트합니다. 사용자는 컨트랙트의 주소(contract)와 새로운 메시지(message)를 파라미터로 제공해야 합니다.updateMessage함수를 호출하여message상태 변수의 값을 변경한 후, 변경된 메시지와 관련 트랜잭션의 링크를 출력합니다.read: 이 태스크는HelloLuniverse컨트랙트의 현재message상태 변수 값을 조회합니다. 사용자는 컨트랙트의 주소(contract)를 파라미터로 제공해야 합니다. 조회된 메시지 값을 출력합니다.
hardhat.config.ts 파일 내에서 우리가 이전에 작성한 helloLuniverse 태스크 파일을 불러옵니다.
// hardhat.config.ts
import { HardhatUserConfig } from "hardhat/config";
import "@nomicfoundation/hardhat-toolbox";
import dotenv from "dotenv";
import "./tasks/helloLuniverse"; // Add this line
dotenv.config();
// -- snip --
루니버스와 Hardhat을 연동하는 과정을 성공적으로 마쳤습니다. 이제 여러분은 루니버스 노드와 상호작용하는 스마트 컨트랙트를 자유롭게 개발할 수 있습니다. 루니버스를 활용해서 다양한 디앱을 개발해보세요!
Updated 5 months ago