Event / Log
Luniversity에 오신 여러분을 환영합니다!😆 앞서 진행했던 Account / EVM은 재밌게 보고 오셨나요? 이제 여러분은 이더리움 Account의 구조와 이더리움 네트워크의 동작 방식을 알게 되었습니다.
아직 진행하지 않았다면 Account / EVM 파트를 진행해 보며 Account / EVM과 이더리움 네트워크의 동작에 대해서 배워보세요!
이번 시간에는 Event가 무엇인지, Event의 log를 어떻게 확인할 수 있는지 알아보도록 하겠습니다.
Event란?
Event란 스마트 컨트랙트에서 지정된 Method가 실행될 때 생성되는 상태 변화를 블록체인에 저장할 수 있는 기능입니다. 이렇게 Event 기능을 이용하면 데이터를 검색과 이력 추적이 용이해집니다. 이 외에도 Event가 발생할 떄 마다 외부 어플리케이션에서 이를 감지하여 활용할 수 있어 스마트 컨트랙트와 외부 시스템과의 상호작용을 강화하는데 사용됩니다.
Event를 호출하면 Transaction이 실행된 후, Transaction Receipt의 log에 Topics[0], Topics[1], Topics[2], Topics[3] 이라는 이름으로 최대 4개의 값으로 저장된 것을 확인할 수 있습니다. Topics[0]은 Event의 signature를, Topics[1] ~ Topics[3]은 컨트랙트 작성자가 지정하여 Indexed된 값을 의미합니다. 예를 들어 스마트 컨트랙트에 다음과 같은 코드가 있다고 가정해 보겠습니다.
event Transfer(address indexed from, address indexed to, uint amount);이 이벤트는 Token Transfer에 대한 Event로 Transfer Method를 실행하여 트랜잭션이 발생할 경우, eventLog로 블록체인에 해당 값을 저장합니다. Topics[0]에는 transfer에 대한 Event Signature가, Topics[1]에는 from의 address, Topics[2]에는 to의 address가 저장됩니다. amount의 경우, 별도의 Index가 없으므로 일반적인 data field에 저장됩니다.
Event가 어떤 것인지 이해가 되시나요? 그렇다면 한 번 실제로 Event가 작성된 컨트랙트를 배포하고 실제 Method를 호출한 뒤 Event Log를 확인해 보도록 하겠습니다! 🙋
Contract 작성 및 배포
Event를 생성하기 위해서는 컨트랙트에 Event를 명시해야 합니다. 그렇기 때문에 다음과 같이 컨트랙트를 작성하였습니다. 컨트랙트는 Message를 확인하는 getMessage Method와 Message를 변경하는 setMessage Method 2가지로 구성되었습니다.
// SPDX-License-Identifier: UNLICENSED
pragma solidity ^0.8.0;

contract MessageContract {
    string private message;

    event MessageSet(address indexed from, address indexed to, string message);

    constructor() {
        message = "Hello World";
    }

    function getMessage() public view returns (string memory) {
        return message;
    }

    function setMessage(string memory newMessage) public {
        require(keccak256(abi.encodePacked(message)) != keccak256(abi.encodePacked(newMessage)), "New message is same as current message");
        emit MessageSet(msg.sender, address(this), newMessage);
        message = newMessage;
    }
}
최초 Message는 Hello World로 작성되었고 event는 MessageSet이라는 이름으로 from, to address를 Index하는 것을 확인할 수 있습니다. emit MessageSet(msg.sender, address(this), newMessage); 이 코드를 통해 이 event는 setMessage Method를 실행할 때 생성되는 것을 확인할 수 있습니다.
작성한 컨트랙트를 컴파일하여 bytecode와 ABI를 반환 받습니다. 컴파일하기 가장 간편한 방법은 Remix를 이용하는 방법입니다. 반환받은 bytecode와 ABI는 다음과 같습니다.
bytecode : 60806040523480156200001157600080fd5b506040518060400160405280600b81526020017f48656c6c6f20576f726c6400000000000000000000000000000000000000000081525060009081620000589190620002d9565b50620003c0565b600081519050919050565b7f4e487b7100000000000000000000000000000000000000000000000000000000600052604160045260246000fd5b7f4e487b7100000000000000000000000000000000000000000000000000000000600052602260045260246000fd5b60006002820490506001821680620000e157607f821691505b602082108103620000f757620000f662000099565b5b50919050565b60008190508160005260206000209050919050565b60006020601f8301049050919050565b600082821b905092915050565b600060088302620001617fffffffffffffffffffffffffffffffffffffffffffffffffffffffffffffffff8262000122565b6200016d868362000122565b95508019841693508086168417925050509392505050565b6000819050919050565b6000819050919050565b6000620001ba620001b4620001ae8462000185565b6200018f565b62000185565b9050919050565b6000819050919050565b620001d68362000199565b620001ee620001e582620001c1565b8484546200012f565b825550505050565b600090565b62000205620001f6565b62000212818484620001cb565b505050565b5b818110156200023a576200022e600082620001fb565b60018101905062000218565b5050565b601f82111562000289576200025381620000fd565b6200025e8462000112565b810160208510156200026e578190505b620002866200027d8562000112565b83018262000217565b50505b505050565b600082821c905092915050565b6000620002ae600019846008026200028e565b1980831691505092915050565b6000620002c983836200029b565b9150826002028217905092915050565b620002e4826200005f565b67ffffffffffffffff8111156200030057620002ff6200006a565b5b6200030c8254620000c8565b620003198282856200023e565b600060209050601f8311600181146200035157600084156200033c578287015190505b620003488582620002bb565b865550620003b8565b601f1984166200036186620000fd565b60005b828110156200038b5784890151825560018201915060208501945060208101905062000364565b86831015620003ab5784890151620003a7601f8916826200029b565b8355505b6001600288020188555050505b505050505050565b6108ef80620003d06000396000f3fe608060405234801561001057600080fd5b50600436106100365760003560e01c8063368b87721461003b578063ce6d41de14610057575b600080fd5b61005560048036038101906100509190610368565b610075565b005b61005f61017c565b60405161006c9190610430565b60405180910390f35b80604051602001610086919061048e565b6040516020818303038152906040528051906020012060006040516020016100ae919061059d565b6040516020818303038152906040528051906020012003610104576040517f08c379a00000000000000000000000000000000000000000000000000000000081526004016100fb90610626565b60405180910390fd5b3073ffffffffffffffffffffffffffffffffffffffff163373ffffffffffffffffffffffffffffffffffffffff167ffb2c8bec470118dbfe75e428c8fa4007bb843bb1078e7195255c351f6e54afe1836040516101619190610430565b60405180910390a3806000908161017891906107e7565b5050565b60606000805461018b906104d4565b80601f01602080910402602001604051908101604052809291908181526020018280546101b7906104d4565b80156102045780601f106101d957610100808354040283529160200191610204565b820191906000526020600020905b8154815290600101906020018083116101e757829003601f168201915b5050505050905090565b6000604051905090565b600080fd5b600080fd5b600080fd5b600080fd5b6000601f19601f8301169050919050565b7f4e487b7100000000000000000000000000000000000000000000000000000000600052604160045260246000fd5b6102758261022c565b810181811067ffffffffffffffff821117156102945761029361023d565b5b80604052505050565b60006102a761020e565b90506102b3828261026c565b919050565b600067ffffffffffffffff8211156102d3576102d261023d565b5b6102dc8261022c565b9050602081019050919050565b82818337600083830152505050565b600061030b610306846102b8565b61029d565b90508281526020810184848401111561032757610326610227565b5b6103328482856102e9565b509392505050565b600082601f83011261034f5761034e610222565b5b813561035f8482602086016102f8565b91505092915050565b60006020828403121561037e5761037d610218565b5b600082013567ffffffffffffffff81111561039c5761039b61021d565b5b6103a88482850161033a565b91505092915050565b600081519050919050565b600082825260208201905092915050565b60005b838110156103eb5780820151818401526020810190506103d0565b60008484015250505050565b6000610402826103b1565b61040c81856103bc565b935061041c8185602086016103cd565b6104258161022c565b840191505092915050565b6000602082019050818103600083015261044a81846103f7565b905092915050565b600081905092915050565b6000610468826103b1565b6104728185610452565b93506104828185602086016103cd565b80840191505092915050565b600061049a828461045d565b915081905092915050565b7f4e487b7100000000000000000000000000000000000000000000000000000000600052602260045260246000fd5b600060028204905060018216806104ec57607f821691505b6020821081036104ff576104fe6104a5565b5b50919050565b60008190508160005260206000209050919050565b60008154610527816104d4565b6105318186610452565b9450600182166000811461054c576001811461056157610594565b60ff1983168652811515820286019350610594565b61056a85610505565b60005b8381101561058c5781548189015260018201915060208101905061056d565b838801955050505b50505092915050565b60006105a9828461051a565b915081905092915050565b7f4e6577206d6573736167652069732073616d652061732063757272656e74206d60008201527f6573736167650000000000000000000000000000000000000000000000000000602082015250565b60006106106026836103bc565b915061061b826105b4565b604082019050919050565b6000602082019050818103600083015261063f81610603565b9050919050565b60006020601f8301049050919050565b600082821b905092915050565b6000600883026106937fffffffffffffffffffffffffffffffffffffffffffffffffffffffffffffffff82610656565b61069d8683610656565b95508019841693508086168417925050509392505050565b6000819050919050565b6000819050919050565b60006106e46106df6106da846106b5565b6106bf565b6106b5565b9050919050565b6000819050919050565b6106fe836106c9565b61071261070a826106eb565b848454610663565b825550505050565b600090565b61072761071a565b6107328184846106f5565b505050565b5b818110156107565761074b60008261071f565b600181019050610738565b5050565b601f82111561079b5761076c81610505565b61077584610646565b81016020851015610784578190505b61079861079085610646565b830182610737565b50505b505050565b600082821c905092915050565b60006107be600019846008026107a0565b1980831691505092915050565b60006107d783836107ad565b9150826002028217905092915050565b6107f0826103b1565b67ffffffffffffffff8111156108095761080861023d565b5b61081382546104d4565b61081e82828561075a565b600060209050601f831160018114610851576000841561083f578287015190505b61084985826107cb565b8655506108b1565b601f19841661085f86610505565b60005b8281101561088757848901518255600182019150602085019450602081019050610862565b868310156108a457848901516108a0601f8916826107ad565b8355505b6001600288020188555050505b50505050505056fea2646970667358221220d3f9e590b08dda07fb86689b4ea433337a5b927800fdd7c45db1593113de89bb64736f6c63430008120033[
{
"inputs": [],
"stateMutability": "nonpayable",
"type": "constructor"
},
{
"anonymous": false,
"inputs": [
{
"indexed": true,
"internalType": "address",
"name": "from",
"type": "address"
},
{
"indexed": true,
"internalType": "address",
"name": "to",
"type": "address"
},
{
"indexed": false,
"internalType": "string",
"name": "message",
"type": "string"
}
],
"name": "MessageSet",
"type": "event"
},
{
"inputs": [],
"name": "getMessage",
"outputs": [
{
"internalType": "string",
"name": "",
"type": "string"
}
],
"stateMutability": "view",
"type": "function"
},
{
"inputs": [
{
"internalType": "string",
"name": "newMessage",
"type": "string"
}
],
"name": "setMessage",
"outputs": [],
"stateMutability": "nonpayable",
"type": "function"
}
]bytecode와 ABI 그리고 ethers.js를 이용하여 이더리움 네트워크에 컨트랙트를 배포합니다. (컨트랙트 배포에는 ETH가 필요하므로 테스트를 위해 무료로 손쉽게 ETH를 구할 수 있는 이더리움 Sepolia 테스트넷을 이용하여 배포합니다.)
Node를 이용하기 위한 RPC-Endpoint 구하기Node를 이용하기 위해서는 해당 Node를 특정하는 RPC-Endpoint가 필요합니다. 아래 링크를 통해 Luniverse에서 제공하는 RPC-Endpoint를 얻을 수 있습니다. RPC-Endpont는 네트워크 별로 달라질 수 있으며 현재 Luniverse에서 제공하는 Ethereum의 네트워크는 Mainnet, Goerli, Sepolia 입니다.
const { ethers } = require("ethers");

const bytecode = "{ Your  Bytecode }";
const abi = "{ Your ABI }";
const provider = new ethers.providers.JsonRpcProvider("https://ethereum-sepolia.luniverse.io/{Your Node ID}");
const privateKey = "{Your Private Key}";
const wallet = new ethers.Wallet(privateKey, provider);
const contractFactory = new ethers.ContractFactory(abi, bytecode, wallet);

contractFactory.deploy()
  .then((deployedContract) => {
    console.log(`Contract deployed at address: ${deployedContract.address}`);
  })
  .catch((error) => {
    console.log(`Error deploying contract: ${error}`);
  });
이더리움 네트워크에 연결한 후, Private Key를 이용하여 새로운 wallet 객체를 생성, 이를 이용해서 컨트랙트를 이더리움 네트워크에 배포하게 됩니다. 배포에 성공할 경우 컨트랙트 주소가 반환됩니다.
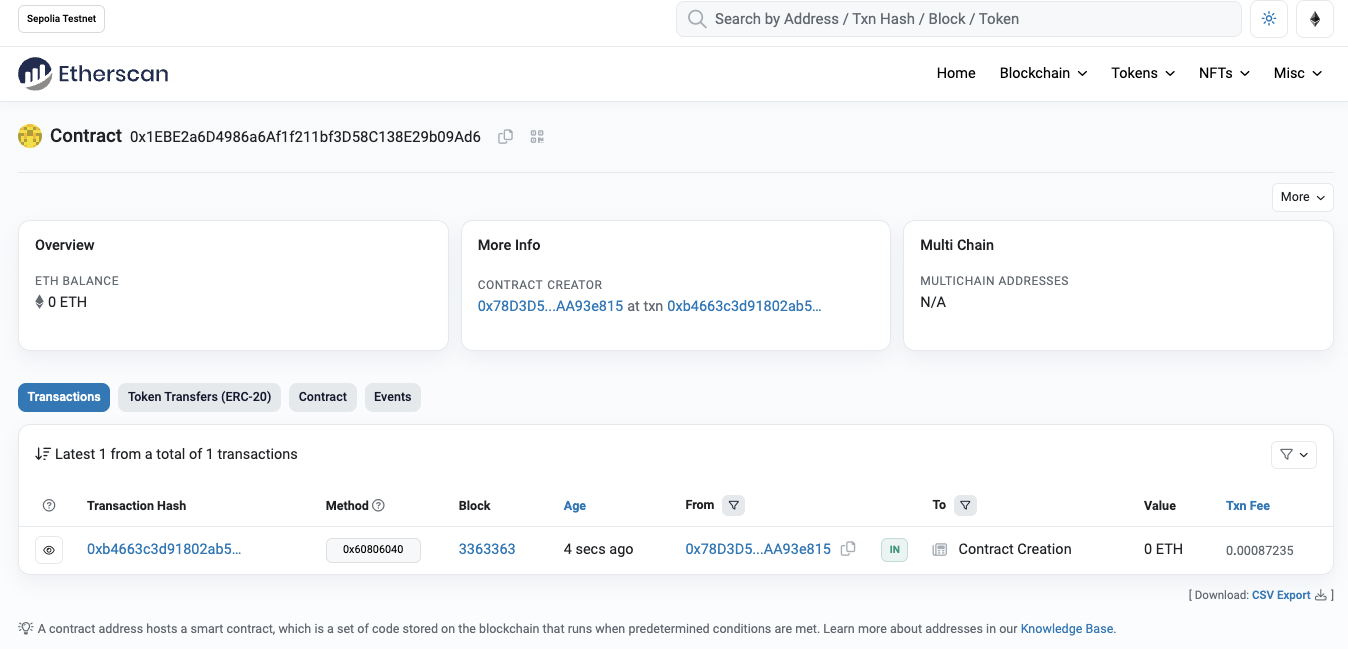
Contract deployed at address: 0x1EBE2a6D4986a6Af1f211bf3D58C138E29b09Ad6해당 주소를 Sepolia Scan에 검색하여 배포가 잘 되었는지 확인해 봅니다.
Method 실행 및 Event 확인
컨트랙트가 잘 배포되었는지 확인하기 위해 getMessage Method를 이용하여 확인합니다. ethers.js를 이용하여 컨트랙트의 Method를 호출하는 방법은 다음과 같습니다.
const { ethers } = require("ethers");

const nodeId = "{Your Node ID}";
const privateKey = "{Your Private Key}";
const contractAddress = "{Your Contract Address}";
const abi = "{Your ABI}";

const provider = new ethers.providers.JsonRpcProvider(`https://ethereum-sepolia.luniverse.io/${nodeId}`);

const wallet = new ethers.Wallet(privateKey, provider);
const contract = new ethers.Contract(contractAddress, abi, wallet);
contract.getMessage()
  .then((result) => {
    console.log("Current message:", result);
  })
  .catch((err) => {
    console.error("Failed to get message:", err);
  });
ABI와 컨트랙트의 주소, 그리고 유저의 계정으로 Contract 인스턴스를 생성, Method를 호출합니다. 컨트랙트에 작성한 초기 message 값인 Hello World가 반환되는 것을 확인할 수 있습니다.
Current message: Hello World이번에는 setMessage Method를 이용해 Message를 변경하고 Event Log를 받아보도록 하겠습니다.
const { ethers } = require("ethers");

const nodeId = "{ Your Node ID }"
const privateKey = "{ Your Private Key }";
const contractAddress = "{ Your Contract Address }";
const abi = "{ Your ABI }";

const provider = new ethers.providers.JsonRpcProvider(`https://ethereum-sepolia.luniverse.io/${nodeId}`);
const wallet = new ethers.Wallet(privateKey, provider);
const contract = new ethers.Contract(contractAddress, abi, wallet);

const newMessage = "Hello Ethereum";

contract.setMessage(newMessage)
  .then((tx) => {
    console.log("Transaction hash:", tx.hash);
    contract.once("MessageSet", (from, to, message) => {
      console.log("from :", from, "to :", to, "message :", message);
    });
  })
  .catch((err) => {
    console.error("Failed to set message:", err);
  });
newMessage를 인자로 하여 setMessage Method를 실행합니다. 실행이 완료된 후, Transaction Hash를 반환하고 생성된 event를 반환합니다. 아래와 같이 Transaction Hash, Message set이 확인되시나요?
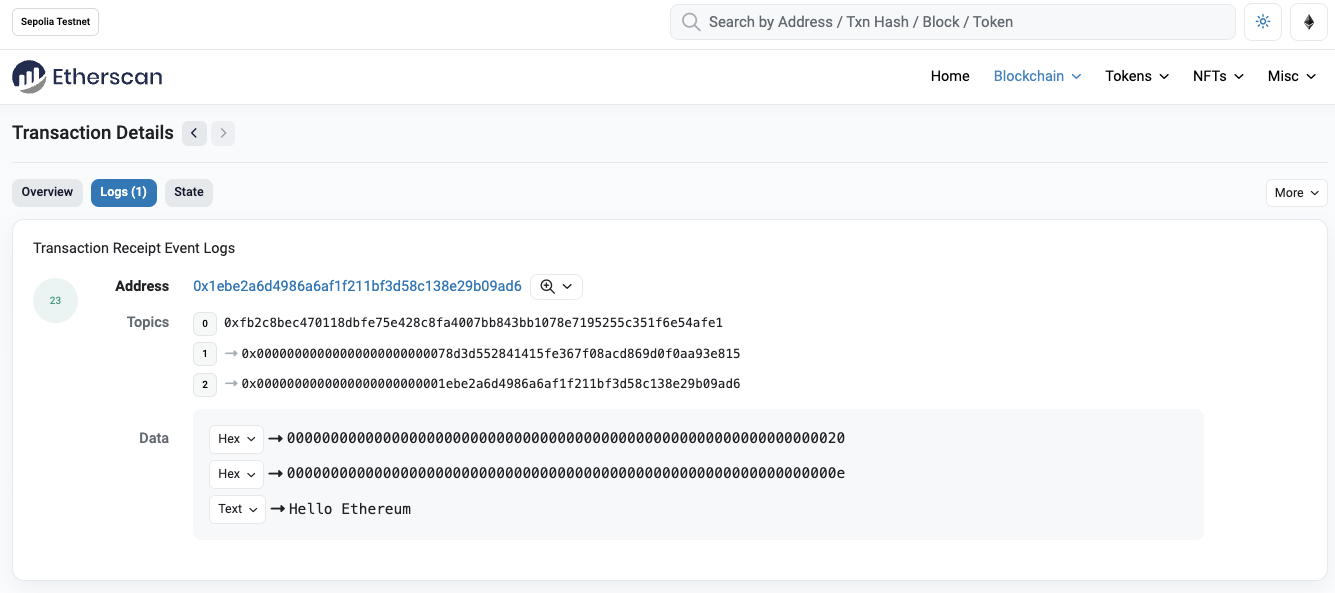
Transaction hash: 0x4142dfc253fe9ab990d48ef1e45249e27d452a23193414c94e74990512e21dc0
Message set: Hello Ethereum
이렇게 생성된 log는 Etherscan에서도 확인이 가능합니다. Topics[0]은 event signature로 MessageSet의 signature가 저장되고 Topics[1]에는 이벤트를 호출한 EOA의 Address, Topics[2]에는 해당 트랜잭션을 받는 Contract의 Address가 저장됩니다. 별도로 Index하지 않은 message의 경우, Data Field에 작성되어 있는 것을 확인할 수 있습니다.
Topics는 Transaction 실행된 후, Receipt를 이용하여 조회할 수 있습니다. Receipt를 불러오는 JSON_RPC는 eth_getTransactionReceipt 입니다. Params로는 Transaction Hash가 필요하며 다음과 같이 작성하여 호출할 수 있습니다.
curl -X POST "https://ethereum-sepolia.luniverse.io/{Your Node ID}" \
--header 'Content-Type: application/json' \
--data '{
   "jsonrpc": "2.0",
   "method": "eth_getTransactionReceipt",
   "params": ["0x4142dfc253fe9ab990d48ef1e45249e27d452a23193414c94e74990512e21dc0"],
   "id": 1
    }'
Topics는 배열로 구성되어 있으며 logs에서 Topics의 데이터를 확인할 수 있습니다.
{
   "jsonrpc":"2.0",
   "id":1,
   "result":
      {
         "blockHash":"0xe0ee8dec1f689b59c7f2a9e527f6c412b48624aa88638960c0c04b7dfe2e4e67",
         "blockNumber":"0x3352da",
         "contractAddress":null,
         "cumulativeGasUsed":"0x7f9c0a",
         "effectiveGasPrice":"0x59682f08",
         "from":"0x78d3d552841415fe367f08acd869d0f0aa93e815",
         "gasUsed":"0x7d58",
         "logs":[
                  {
                     "address":"0x1ebe2a6d4986a6af1f211bf3d58c138e29b09ad6",
                     "topics":
                        [
                          "0xfb2c8bec470118dbfe75e428c8fa4007bb843bb1078e7195255c351f6e54afe1",
                          "0x00000000000000000000000078d3d552841415fe367f08acd869d0f0aa93e815",
                          "0x0000000000000000000000001ebe2a6d4986a6af1f211bf3d58c138e29b09ad6"
                        ],
                        "data":"0x0000000000000000000000000000000000000000000000000000000000000020000000000000000000000000000000000000000000000000000000000000000e48656c6c6f20457468657265756d000000000000000000000000000000000000",
                        "blockNumber":"0x3352da",
                        "transactionHash":"0x4142dfc253fe9ab990d48ef1e45249e27d452a23193414c94e74990512e21dc0",
                        "transactionIndex":"0x12",
                        "blockHash":"0xe0ee8dec1f689b59c7f2a9e527f6c412b48624aa88638960c0c04b7dfe2e4e67",
                        "logIndex":"0x17",
                        "removed":false
                     }
                  ],
            "logsBloom":"0x000000000000000000000000000000000200000400000000000000000000000000000000000000000000000000200000000000000000000000000000000000000000000000000000000000000000000000000000000000000000000000000000000400000000000000000000000000004000000000000000000000000000000800000000000000000000000000000000000000000000000000000000000000000000000000000000000000c0000000000000000000000000000000000000000000000000000000000000000000000000000000000000000000000000000000000000000000000000040000000000004040000000000000000000000000004000",
            "status":"0x1","to":"0x1ebe2a6d4986a6af1f211bf3d58c138e29b09ad6",
            "transactionHash":"0x4142dfc253fe9ab990d48ef1e45249e27d452a23193414c94e74990512e21dc0",
            "transactionIndex":"0x12",
            "type":"0x2"
        }
}
Luniverse를 이용하여 Event Log 확인하기
INSTALLATION예제를 실행하기 위해서는 라이브러리를 설치해야 합니다. 아래 명령어를 입력하여 필요한 라이브러리를 설치할 수 있습니다.
$ npm install axios -save
Event Log를 확인하는 것은 Transaction을 분석 및 검증하기 위해 필요한 중요한 작업입니다. 그렇기 때문에 Luniverse도 Event Log를 확인할 수 있도록 searchEvent라는 API를 제공하고 있습니다.
searchEvent API를 호출하기 위해서는 Contract Address와 컨트랙트에 작성된 eventName, 그리고 ABI가 필요합니다. 이를 이용하여 다음과 같이 호출할 수 있습니다.
INSTALLATION
searchEvent API의 경우, 완전히 confirm된 블록의 Event만 불러옵니다. Path Params를 이용하여 fromBlockNumber와 toBlockNumber를 설정하여 설정된 BlockNumber 이내에 있는 Event를 조회할 수 있습니다.
const { axios } = require('axios');

const contractAddress = "{ Your Contract Address }";
const eventName = "{ Event Name to search: In this case, it would be MessageSet }"
const authToken = "{ Your Access Token }"
const abi = "{ Your ABI }";

const options = {
  method: 'POST',
  url: `https://web3.luniverse.io/v1/ethereum/sepolia/events/${contractAddress}?eventName=${eventName}`,
  headers: {
    accept: 'application/json',
    'content-type': 'application/json',
    Authorization: `Bearer ${authToken}`
  },
  data: { abi: abi }
};

axios
  .request(options)
  .then(function (response) {
    console.log(response.data.data.items[0]);
  })
  .catch(function (error) {
    console.error(error);
  });
정확한 값을 입력하였다면 위의 코드 실행 시 다음과 같은 값을 받을 수 있습니다.
{
  "contract": "0x1EBE2a6D4986a6Af1f211bf3D58C138E29b09Ad6",
  "name": "MessageSet",
  "signature": "MessageSet(address,address,string)",
  "transaction": {
    "hash": "0x57c0f7eda270ff450e5696437a5e5d5ea473c29d7c53d4cb54f76834913725fb"
  },
  "block": {
    "hash": "0x25d26ff140ef97345112d9cec782f554791796b9f3e3bce15dac42c1280ca7cf",
    "number": 3364059
  },
  "topic": [
    "0xfb2c8bec470118dbfe75e428c8fa4007bb843bb1078e7195255c351f6e54afe1",
    "0x00000000000000000000000078d3d552841415fe367f08acd869d0f0aa93e815",
    "0x0000000000000000000000001ebe2a6d4986a6af1f211bf3d58c138e29b09ad6"
  ],
  "data": "0x0000000000000000000000000000000000000000000000000000000000000020000000000000000000000000000000000000000000000000000000000000000e48656c6c6f20457468657265756d000000000000000000000000000000000000",
  "logs": {
    "from": "0x78D3D552841415FE367F08ACD869d0f0AA93e815",
    "to": "0x1EBE2a6D4986a6Af1f211bf3D58C138E29b09Ad6",
    "message": "Hello Ethereum"
  },
  "index": 14
}
실행된 event에 대한 Log 뿐만 아니라 저장된 block의 hash와 number, 트랜잭션의 Hash도 확인할 수 있습니다. searchEvent API를 이용하면 Log와 관련된 데이터를 더욱 보기 쉽게 작성되어 있어 User가 이용하기 편리하다는 장점이 있습니다.
이번 시간에는 Event와 Log에 대해서 알아보고 실제 Event가 작성된 컨트랙트를 배포, Method 호출 및 Log까지 확인해 보았습니다! 이제 여러분은 이더리움 네트워크의 모든 컨트랙트의 Log를 확인하실 수 있습니다!
다음 시간에는 이더리움에서 자주 등장하는 Call이란 무엇인지, 어떻게 실행되는지 자세히 분석해 보도록 하겠습니다!
Luniverse는 Public Blockchain을 손 쉽게 이용할 수 있도록 다양한 API와 Node Provider Service를 제공하고 있습니다. 오늘 학습한 내용 외에도 다양한 API를 제공하고 있으며 *여기(Luniverse Multichain API 확인하기)를 클릭하여 Nova가 제공하는 다양한 API를 확인해 볼 수 있습니다! 😄😄
Updated 5 months ago